
 Edit on GitHub
Alibab Cloud Terraform サンプルプロジェクトの実行
はじめに
前章は 簡単なWebサーバを立ち上げるというサンプルプロジェクトを作成しました。今章はサンプルプロジェクトを実行しつつ、Terraformの流れや中身を確認します。
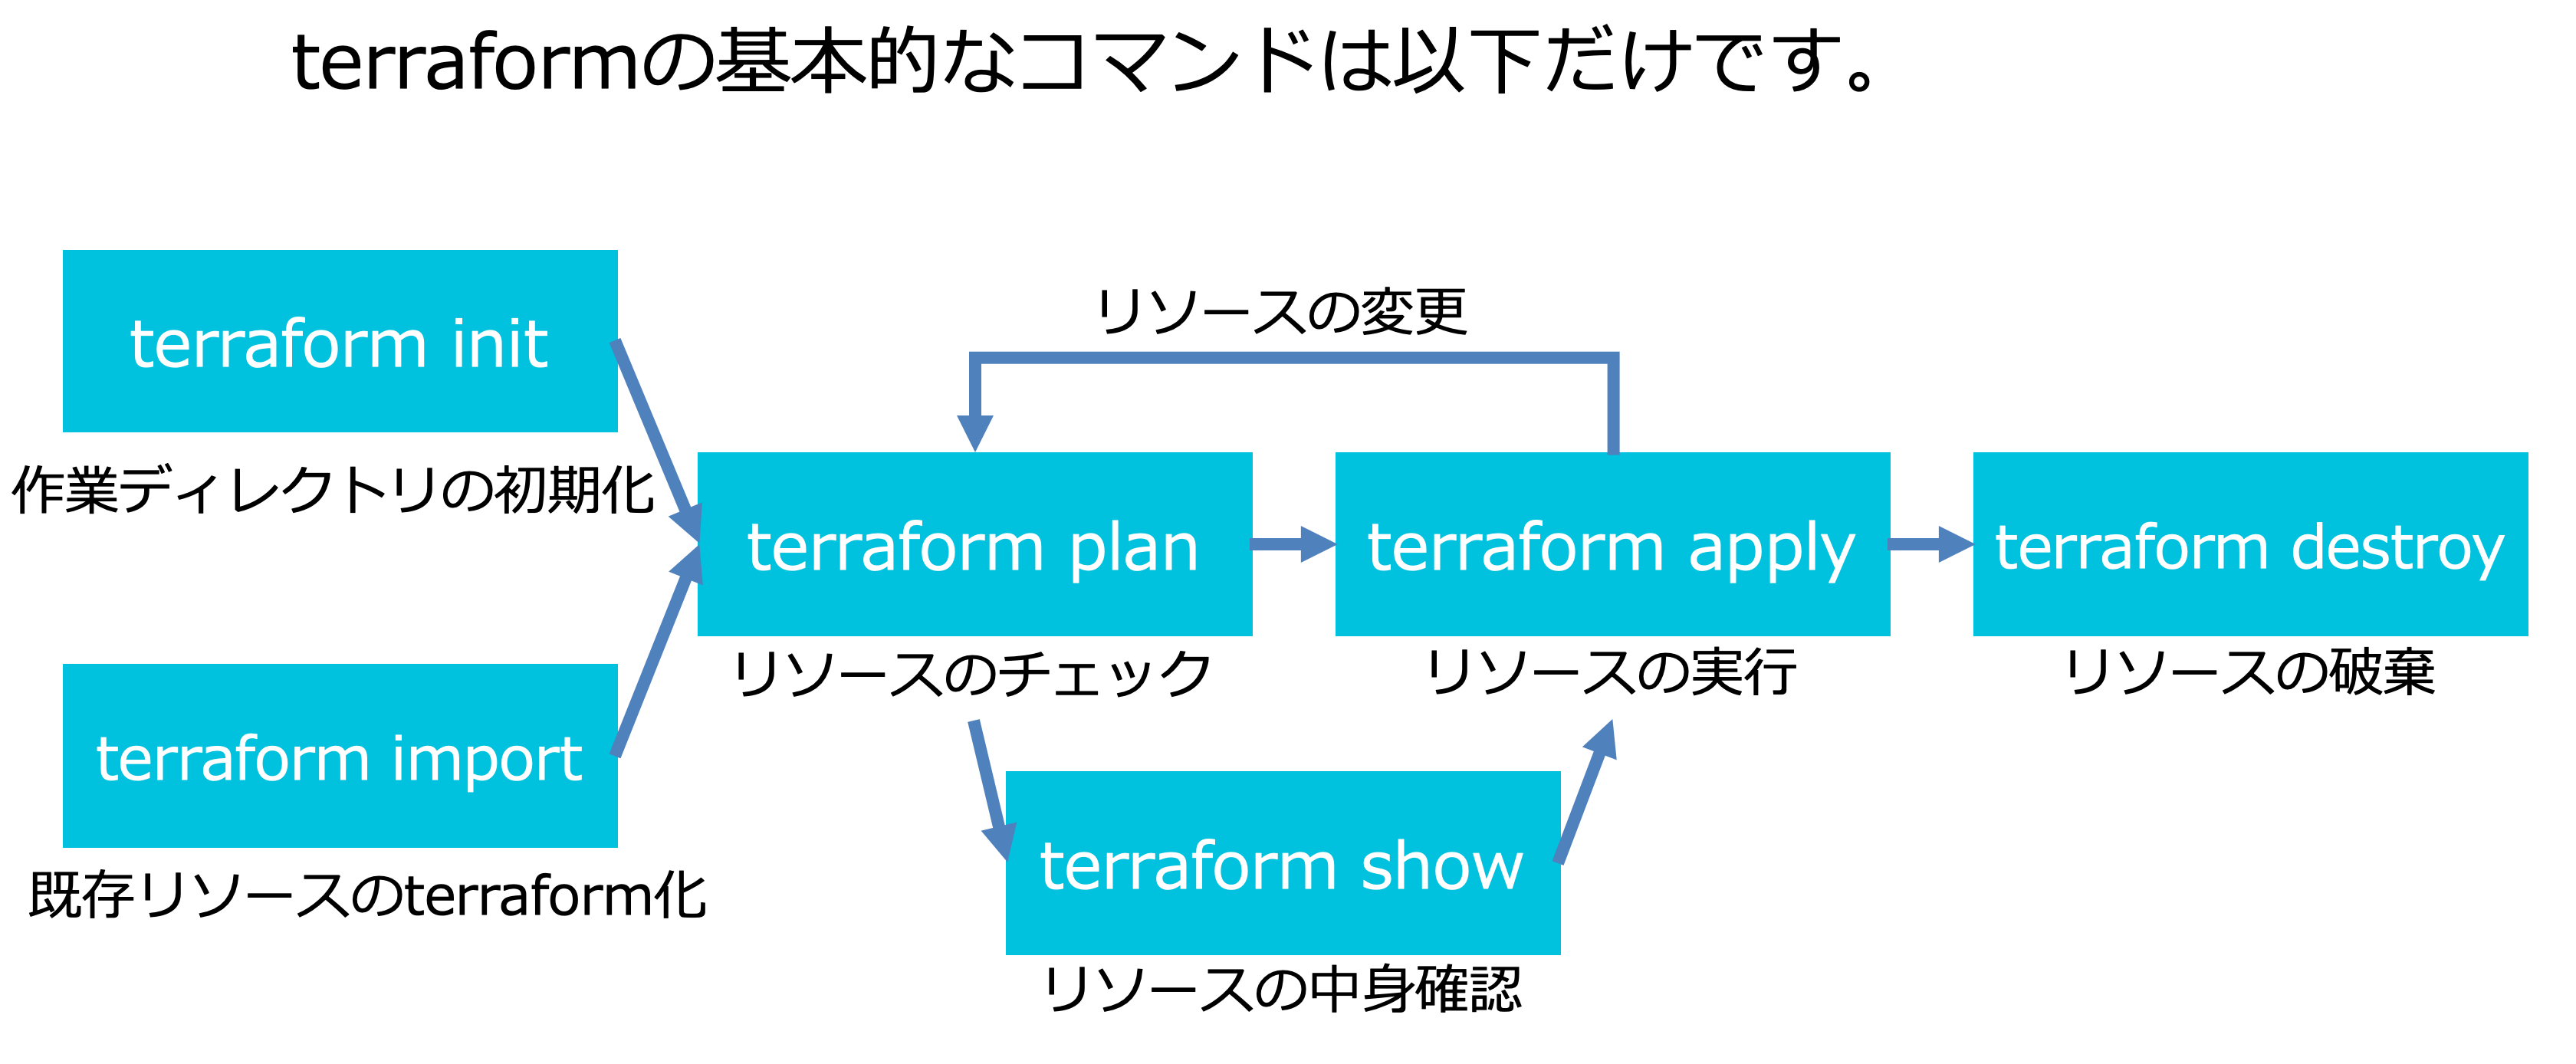
Terraformの実行は非常にシンプルです。以下図のようにterraform initから始まり、terraform play、terraform applyでリソース作成を実行します。
1. terraform init
コードを書いたら「terraform init」コマンドを実行します。このコマンドはTerraformの実行に必要なプロパイダーのバイナリをダウンロードしてくれます。「Terraform has been successfully initialized!」と表示されていれば作業ディレクトリ構成的にOKです。
$ terraform initInitializing provider plugins...・・・Terraform has been successfully initialized!
2. terraform plan
次は「terraform plan」コマンドです。
RAMなどの情報を別途設定ファイル confing.tfvars へ記載した場合は以下のコマンドで実行します。
$ terraform plan -var-file="confing.tfvars"Refreshing Terraform state in-memory prior to plan...The refreshed state will be used to calculate this plan, but will not bepersisted to local or remote state storage.------------------------------------------------------------------------An execution plan has been generated and is shown below.Resource actions are indicated with the following symbols:+ createTerraform will perform the following actions:+ alicloud_instance.ECS_instanceid: <computed>availability_zone: "ap-northeast-1a"deletion_protection: "false"host_name: "ECS_instance_for_terraform"image_id: "centos_7_04_64_20G_alibase_201701015.vhd"instance_charge_type: "PostPaid"instance_name: "ECS_instance_for_terraform"instance_type: "ecs.n4.small"internet_max_bandwidth_out: "0"key_name: <computed>private_ip: <computed>public_ip: <computed>role_name: <computed>security_groups.#: <computed>spot_strategy: "NoSpot"status: <computed>subnet_id: <computed>system_disk_category: "cloud_efficiency"system_disk_size: "40"volume_tags.%: <computed>vswitch_id: "${alicloud_vswitch.vsw.id}"+ alicloud_security_group.sgid: <computed>inner_access: "true"name: "ECS_instance_for_terraform-sg"vpc_id: "${alicloud_vpc.vpc.id}"+ alicloud_security_group_rule.allow_httpid: <computed>cidr_ip: "0.0.0.0/0"ip_protocol: "tcp"nic_type: "intranet"policy: "accept"port_range: "80/80"priority: "1"security_group_id: "${alicloud_security_group.sg.id}"type: "ingress"+ alicloud_vpc.vpcid: <computed>cidr_block: "192.168.1.0/24"name: "ECS_instance_for_terraform-vpc"route_table_id: <computed>router_id: <computed>router_table_id: <computed>+ alicloud_vswitch.vswid: <computed>availability_zone: "ap-northeast-1a"cidr_block: "192.168.1.0/28"vpc_id: "${alicloud_vpc.vpc.id}"Plan: 5 to add, 0 to change, 0 to destroy.------------------------------------------------------------------------Note: You didn't specify an "-out" parameter to save this plan, so Terraformcan't guarantee that exactly these actions will be performed if"terraform apply" is subsequently run.
緑色の「+」マーク付きリソースが出力されています。これは「新規にリソースを作成する」という意味です。 削除や変更など逆の場合は「-」マークが表示されます。これは後述します。
3. terraform apply
今度はリソースを実行、「terraform apply」コマンドを実行します。このコマンドでは、改めてplan結果が表示され、本当に実行していいか確認が行われます。
こちらもRAMなどの情報を別途設定ファイルconfing.tfvarsへ記載した場合は以下のコマンドで実行します。
$ terraform apply -var-file="confing.tfvars"......Do you want to perform these actions?Terraform will perform the actions described above.Only 'yes' will be accepted to approve.Enter a value:
途中、「Enter a value:」と表示されますので、『yes』と入力で実行します。
alicloud_instance.ECS_instance: Still creating... (10s elapsed)alicloud_instance.ECS_instance: Still creating... (20s elapsed)alicloud_instance.ECS_instance: Still creating... (30s elapsed)alicloud_instance.ECS_instance: Still creating... (40s elapsed)alicloud_instance.ECS_instance: Still creating... (50s elapsed)alicloud_instance.ECS_instance: Creation complete after 56s (ID: i-6weea1q1tr8gdvbb4tig)Apply complete! Resources: 1 added, 0 changed, 0 destroyed.
これでAlibabaCloud ECSコンソールでも、ECSが作成されたことを確認できます。
 ▲ AlibabaCloud ECSコンソールでもECS作成を確認
4. リソースの設定変更
上記のリソースの作成に成功したら、今度は構成を変更してみましょう。やり方は以下の通りにタグを追加します。 ▼ タグを追加
・・・・・・resource "alicloud_instance" "ECS_instance" {instance_name = "ECS_instance_for_terraform"host_name = "ECS_instance_for_terraform"instance_type = "ecs.n4.small"image_id = "centos_7_04_64_20G_alibase_201701015.vhd"system_disk_category = "cloud_efficiency"security_groups = ["${alicloud_security_group.sg.id}"]availability_zone = "${var.zone}"vswitch_id = "${alicloud_vswitch.vsw.id}"tags={Project = "terraform_training"Platform = "CentOS_7_04_64"Enviroment = "dev"OwnerEmailAddress = "xxxx@xxxxx.xxx"}}
コードを修正したら、再びterraform applyを実行します。
$ terraform apply -var-file="confing.tfvars"......Plan: 0 to add, 1 to change, 0 to destroy.Do you want to perform these actions?Terraform will perform the actions described above.Only 'yes' will be accepted to approve.Enter a value: yes
途中、「Enter a value:」と表示されますので、『yes』と入力で実行します。
alicloud_instance.ECS_instance: Modifying... (ID: i-6weea1q1tr8gdvbb4tig)tags.%: "0" => "4"tags.Enviroment: "" => "dev"tags.OwnerEmailAddress: "" => "xxxx@xxxxx.xxx"tags.Platform: "" => "CentOS_7_04_64"tags.Project: "" => "terraform_training"alicloud_instance.ECS_instance: Modifications complete after 1s (ID: i-6weea1q1tr8gdvbb4tig)Apply complete! Resources: 0 added, 1 changed, 0 destroyed.
AWS マネジメントコンソールでも、Name タグの追加が確認できます。
 ▲ ECSタグの付与を確認
5 リソースの再作成
次に以下ソースのように、Apacheをインストールするよう変更し、apply します。 ▼ User Data で Apache をインストール
resource "alicloud_instance" "ECS_instance" {instance_name = "ECS_instance_for_terraform"host_name = "ECS_instance_for_terraform"instance_type = "ecs.n4.small"image_id = "centos_7_04_64_20G_alibase_201701015.vhd"system_disk_category = "cloud_efficiency"security_groups = ["${alicloud_security_group.sg.id}"]availability_zone = "${var.zone}"vswitch_id = "${alicloud_vswitch.vsw.id}"tags={Project = "terraform_training"Platform = "CentOS_7_04_64"Enviroment = "dev"OwnerEmailAddress = "xxxx@xxxxx.xxx"}user_data = <<EOF#!/bin/bashyum install -y httpdsystemctl start httpd.serviceEOF>>}
修正したら再びterraform applyを実行します。
$ terraform apply -var-file="confing.tfvars"alicloud_vpc.vpc: Refreshing state... (ID: vpc-6wen1y9pbew0gycatrga1)alicloud_security_group.sg: Refreshing state... (ID: sg-6we3mqu997mou7ur7gci)alicloud_vswitch.vsw: Refreshing state... (ID: vsw-6wepztrdw7fn04b8h9y2r)alicloud_security_group_rule.allow_http: Refreshing state... (ID: sg-6we3mqu997mou7ur7gci:ingress:tcp:80/80:intranet:0.0.0.0/0:accept:1)alicloud_instance.ECS_instance: Refreshing state... (ID: i-6weea1q1tr8gdvbb4tig)An execution plan has been generated and is shown below.Resource actions are indicated with the following symbols:-/+ destroy and then create replacementTerraform will perform the following actions:-/+ alicloud_instance.ECS_instance (new resource required)id: "i-6weea1q1tr8gdvbb4tig" => <computed> (forces new resource)availability_zone: "ap-northeast-1a" => "ap-northeast-1a"deletion_protection: "false" => "false"host_name: "iZ6weea1q1tr8gdvbb4tigZ" => <computed>image_id: "centos_7_04_64_20G_alibase_201701015.vhd" => "centos_7_04_64_20G_alibase_201701015.vhd"instance_charge_type: "PostPaid" => "PostPaid"instance_name: "ECS_instance_for_terraform" => "ECS_instance_for_terraform"instance_type: "ecs.n4.small" => "ecs.n4.small"internet_max_bandwidth_out: "0" => "0"key_name: "" => <computed>private_ip: "192.168.1.3" => <computed>public_ip: "" => <computed>role_name: "" => <computed>security_groups.#: "1" => "1"security_groups.3550734980: "sg-6we3mqu997mou7ur7gci" => "sg-6we3mqu997mou7ur7gci"spot_strategy: "NoSpot" => "NoSpot"status: "Running" => <computed>subnet_id: "vsw-6wepztrdw7fn04b8h9y2r" => <computed>system_disk_category: "cloud_efficiency" => "cloud_efficiency"system_disk_size: "40" => "40"tags.%: "4" => "4"tags.Enviroment: "dev" => "dev"tags.OwnerEmailAddress: "xxxx@xxxxx.xxx" => "xxxx@xxxxx.xxx"tags.Platform: "CentOS_7_04_64" => "CentOS_7_04_64"tags.Project: "terraform_training" => "terraform_training"user_data: "" => " #!/bin/bash\n yum install -y httpd\n systemctl start httpd.service\n" (forces new resource)volume_tags.%: "0" => <computed>vswitch_id: "vsw-6wepztrdw7fn04b8h9y2r" => "vsw-6wepztrdw7fn04b8h9y2r"Plan: 1 to add, 0 to change, 1 to destroy.Do you want to perform these actions?Terraform will perform the actions described above.Only 'yes' will be accepted to approve.Enter a value:
今度は『-/+』マークがつき「destroy and then create replacement」というメッセージが出ています。 これは「既存のリソースを削除して新しいリソースを作成する」という意味です。 一部分リソース削除があるため、システム運用に影響が出てしまう場合もありますので要注意です。
alicloud_instance.ECS_instance: Still creating... (10s elapsed)alicloud_instance.ECS_instance: Still creating... (20s elapsed)alicloud_instance.ECS_instance: Still creating... (30s elapsed)alicloud_instance.ECS_instance: Still creating... (40s elapsed)alicloud_instance.ECS_instance: Still creating... (50s elapsed)alicloud_instance.ECS_instance: Creation complete after 56s (ID: i-6weegevun3jit7gpyut8)Apply complete! Resources: 1 added, 0 changed, 1 destroyed.
再びコンソールで確認すると、最初起動したインスタンスが破棄(リリース)され、新しいインスタンスが立ち上がっています。
 ▲ ECSインスタンス名が変わっており、それまで起動したECSがリリース(破棄)されたのがわかります。
最後に
このように、Terraform によるリソースの更新は、「既存リソースをそのまま変更する」 ケースと「リソースが作り直しになる」ケースがあります。本番運用では、意図した挙動 になるか、plan結果をきちんと確認することが大切です。

Alibaba Cloudを始めてみましょう


