FunctionComputeでHologresのジョブスケジューラを設定する方法
FunctionComputeでHologresのジョブスケジューラを設定する方法
本記事では、Hologres を使ってFunctionComputeによるジョブスケジューラを設定する方法をご紹介します。
Hologresとは
Hologres はリアルタイムのインタラクティブ分析サービスです。高い同時実行性と低いレイテンシーでTB、PBクラスのデータの移動や分析を短時間で処理できます。PostgreSQL11と互換性があり、データを多次元で分析し、ビジネスインサイトを素早くキャッチすることができます。
少し前になりますが、Hologresについての資料をSlideShareへアップロードしていますので、こちらも参考になればと思います。
Hologresのジョブスケジューラについて
Hologresのスケジュールジョブに関する公式ソリューションは、主にDataWorksをベースとしています。HoloStdio、というHologresをDataWorksでハンドリングする機能がありますが、国際サイトでは、HologresとDataWorks(HoloStdio)がまだリリースされていないため、他の方法で導入する必要があります。
Hologresは、分散コンピューティングノードに最適化された大規模なストレージと優れたクエリ機能を、低コスト、高性能、高可用性で提供するよう設計されています。リアルタイムのデータウェアハウスソリューションとリアルタイムのインタラクティブなクエリサービスを提供します。
つまり、Hologresに関連するスクリプトやSQL文を定期的に実行するためのトリガーを構築することが今回のポイントとなります。
前提条件
- Alibaba Cloudのアカウントを持っている
- HologresとFunction Computeを有効化している
- Hologresのインスタンスを所持している
FunctionCompute によるソリューション(Java版)
Alibaba Cloud Function Computeは、フルマネージドなイベントドリブンコンピューティングサービスです。サーバレスとして運用ですが、 time trigger を設定することで、指定した時間に自動的に関数を起動することができます。
https://www.alibabacloud.com/cloud-tech/doc-detail/68172.htm
以下の手順では、Java関数に基づいて、10分ごとにHologresパーティションテーブルにデータを挿入するスケジュールジョブを構築します。
STEP1: Hologresにてテーブルを準備
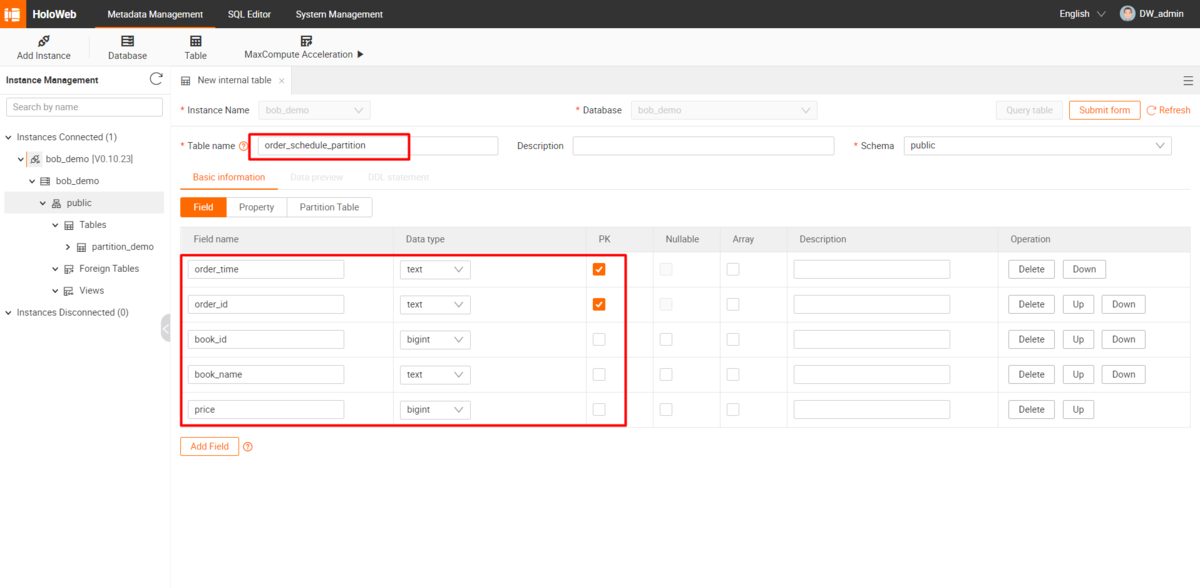
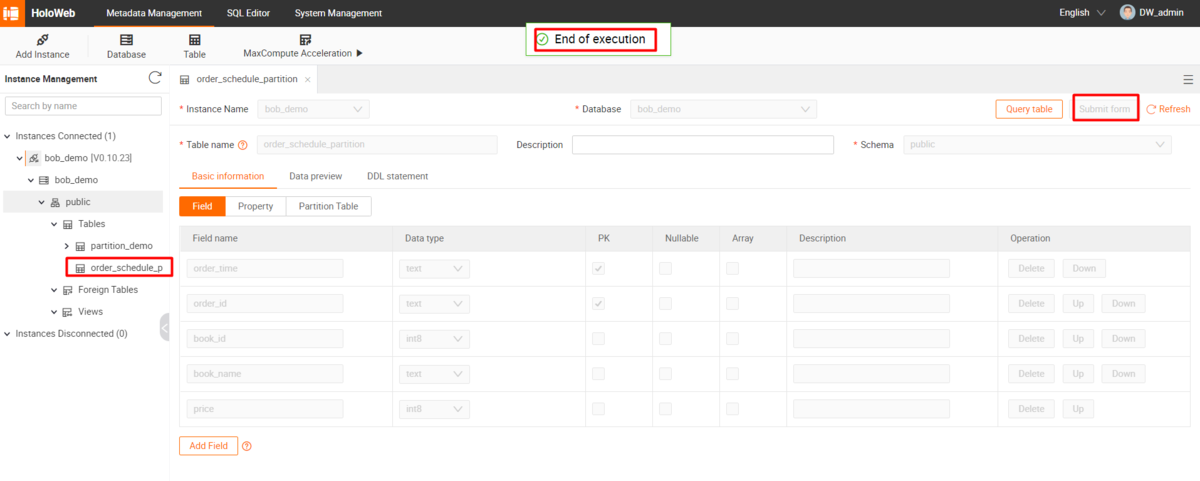
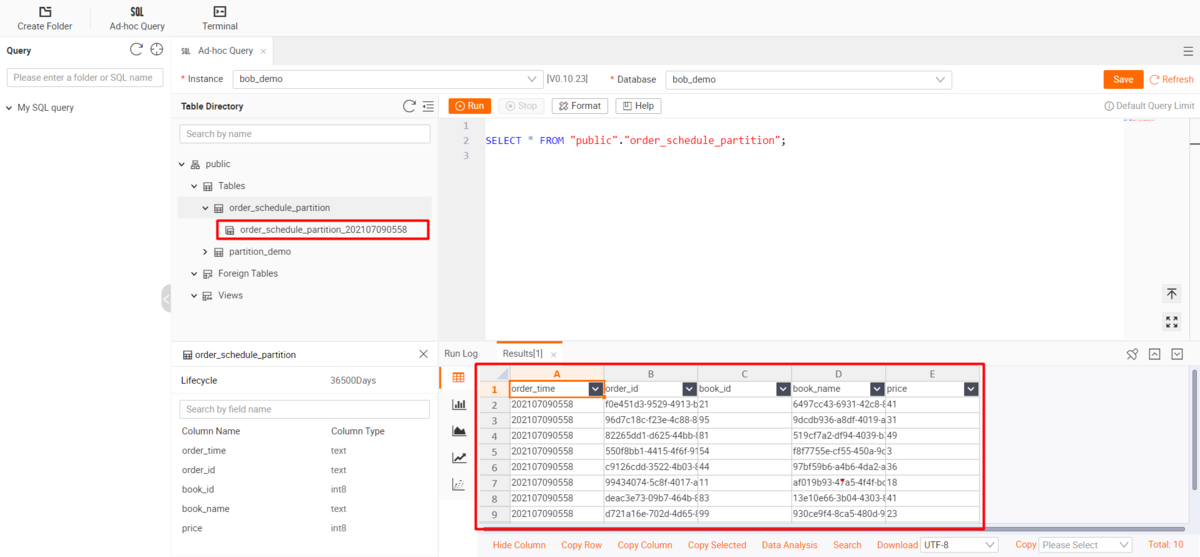
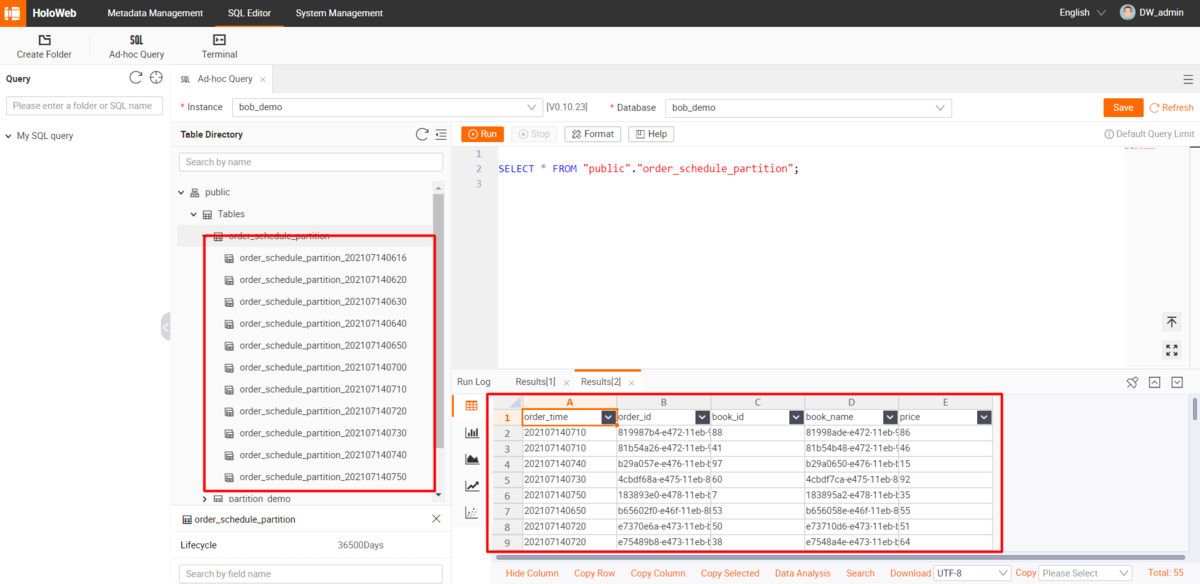
Hologresでorder_schedule_partitionという名前のテーブルを、order_timeというカラムをパーティションキーとして作成します。

STEP2: FunctionComputeでサンプルコードを準備
FunctionComputeは多くのプログラミング言語 をサポートしています。ここでは「Java」を例として構築します。
Javaで構築する場合、「fc-java-core」パッケージを使って、「FunctionCompute」が提供する定義済みのハンドラを実装する必要があります。
より詳しい情報はFunctionComputeによる開発ガイドライン を参照してください。
https://www.alibabacloud.com/cloud-tech/doc-detail/113518.htm
FC (Function Compute)ランタイムパッケージの他に、HologresデータベースにSQLステートメントを送信するためには、Hologres connectorが必要です。
HologresはPostgreSQL 11に対応しているので、一般的なPostgreSQL JDBCドライバ がサポートされていますが、Hologres専用に開発されたDriverを利用することもできます。
https://mvnrepository.com/artifact/com.alibaba.hologres/postgresql-holo
新しいMavenプロジェクトを作成し、pom.xmlのdependencyセクションを以下のように更新してください。
......<dependencies><dependency><groupId>com.aliyun.fc.runtime</groupId><artifactId>fc-java-core</artifactId><version>1.4.0</version></dependency><dependency><groupId>com.aliyun.fc.runtime</groupId><artifactId>fc-java-common</artifactId><version>2.2.2</version></dependency><dependency><groupId>com.alibaba.hologres</groupId><artifactId>postgresql-holo</artifactId><version>42.2.18.4</version></dependency></dependencies>......
ターゲットパッケージをビルドするには、maven-assembly-pluginも必要です。
以下は設定例です。詳しくはJava runtime environmentをご参照ください。
https://www.alibabacloud.com/cloud-tech/doc-detail/113519.htm#title-d1e-mv5-9t3
......<build><plugins><plugin><artifactId>maven-assembly-plugin</artifactId><version>3.1.0</version><configuration><descriptorRefs><descriptorRef>jar-with-dependencies</descriptorRef></descriptorRefs><appendAssemblyId>false</appendAssemblyId> <!-- this is used for not append id to the jar name --></configuration><executions><execution><id>make-assembly</id> <!-- this is used for inheritance merges --><phase>package</phase> <!-- bind to the packaging phase --><goals><goal>single</goal></goals></execution></executions></plugin><plugin><groupId>org.apache.maven.plugins</groupId><artifactId>maven-compiler-plugin</artifactId><configuration><source>1.8</source><target>1.8</target></configuration></plugin></plugins></build>......
上記設定で問題なければ、上記ScriptからHologresデータベースに接続されると、必要に応じて2つのオペレーションが実行されます。
https://www.alibabacloud.com/cloud-tech/doc-detail/181641.htm
https://www.alibabacloud.com/cloud-tech/doc-detail/130409.htm
関連する操作を行うために、プロジェクト内に新しいJavaクラスを作成します。
public class App implements StreamRequestHandler {@Overridepublic void handleRequest(InputStream inputStream, OutputStream outputStream, Context context) throws IOException {try {// Connection URL, please update based on your own settingsString url = "jdbc:postgresql://{ENDPOINT}:{PORT}/{DBNAME}?user={ACCESS_ID}&password={ACCESS_KEY}";Connection conn = DriverManager.getConnection(url);SimpleDateFormat df = new SimpleDateFormat("yyyyMMddHHmm");String orderTime = df.format(new Date());String table_sql = "create table public.order_schedule_partition_" + orderTime + " partition of public.order_schedule_partition for values in('" + orderTime + "')";// Operation 1: Create partition tableStatement st = conn.createStatement();int update_row = st.executeUpdate(table_sql);context.getLogger().info("Create partition table done! " + update_row);// Operation 2: Insert random dataString data_sql = "insert into order_schedule_partition_" + orderTime + " (order_time, order_id, book_id, book_name, price) VALUES" +"(?, ?, ?, ?, ?)";PreparedStatement pst = conn.prepareStatement(data_sql);Random random = new Random();for (int i = 0; i < 10; ++i) {int j = 1;pst.setString(j++, orderTime);pst.setString(j++, UUID.randomUUID().toString());pst.setInt(j++, random.nextInt(100));pst.setString(j++, UUID.randomUUID().toString());pst.setInt(j++, random.nextInt(50));int related_row = pst.executeUpdate();context.getLogger().info("Insert target row! times: " + i);}/*conn.commit();*/ // Auto Commit by defaultst.close();pst.close();conn.close();} catch (SQLException throwables) {throwables.printStackTrace();}}}
プロジェクトのルートで mvn clean package コマンドを実行すると、targetフォルダにビルドされたJARパッケージができます。
D:\Development\java\workspace\fc-hologres-schedule>mvn clean package[INFO] Scanning for projects.........[INFO][INFO] ------------------< org.example:fc-hologres-schedule >------------------[INFO] Building fc-hologres-schedule 1.0-SNAPSHOT[INFO] --------------------------------[ jar ]---------------------------------[INFO]......[INFO] ------------------------------------------------------------------------[INFO] BUILD SUCCESS[INFO] ------------------------------------------------------------------------[INFO] Total time: 7.587 s[INFO] Finished at: 2021-07-13T14:39:46+08:00[INFO] ------------------------------------------------------------------------
STEP3: FunctionComputeにて、処理内容を設定
Alibaba CloudでFunctionComputeサービスが有効になっていることを確認してください。
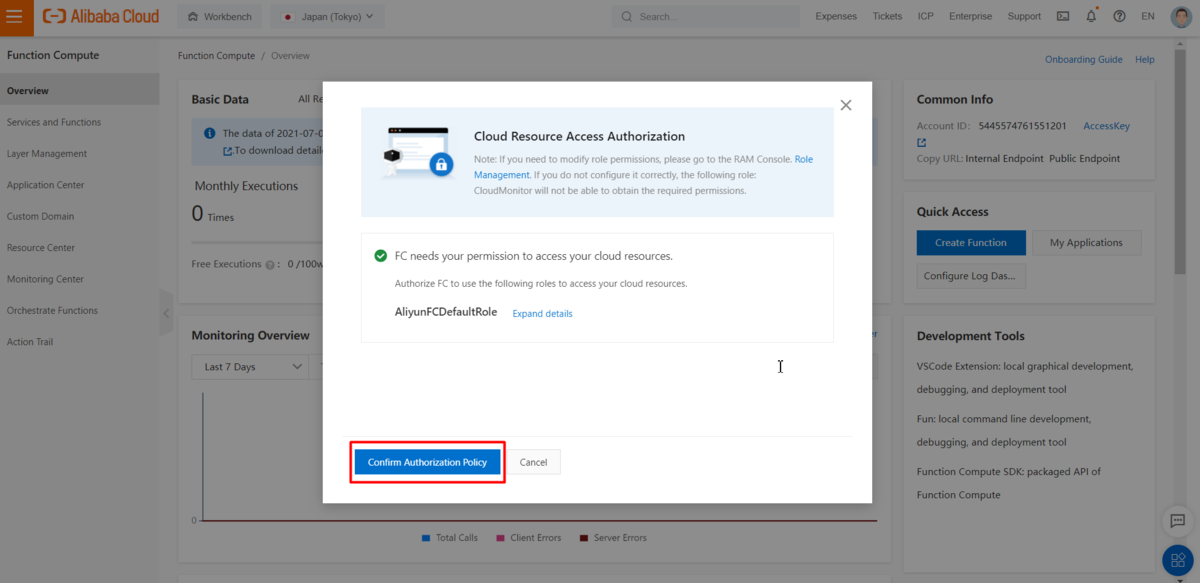
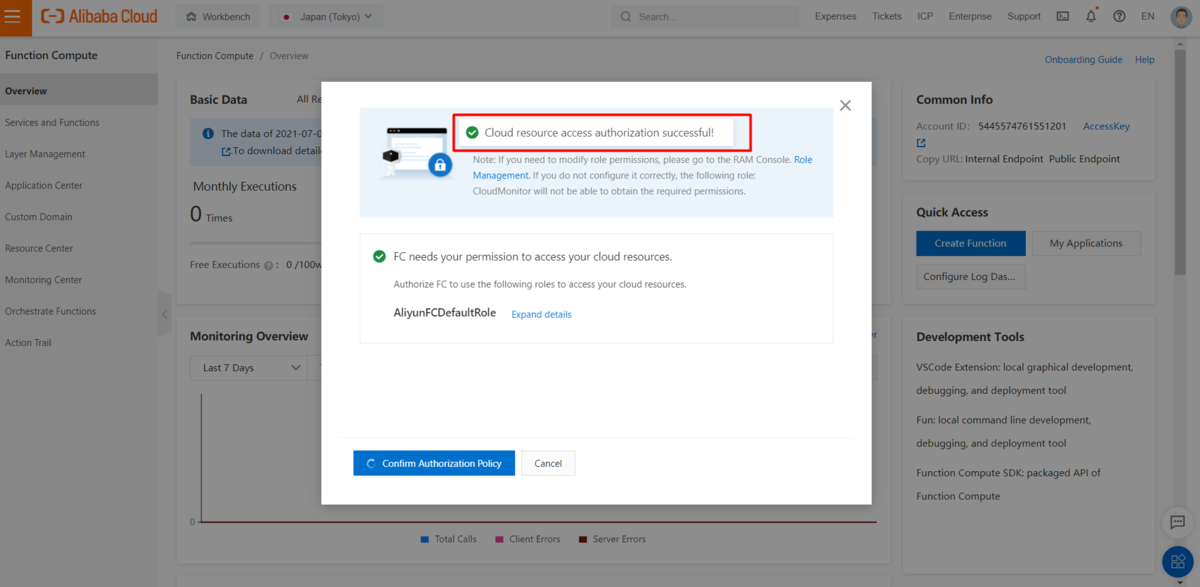
初めてFunction Computeにアクセスする場合は、以下のポップアップウィンドウでクラウドリソースの認証を行ってください。
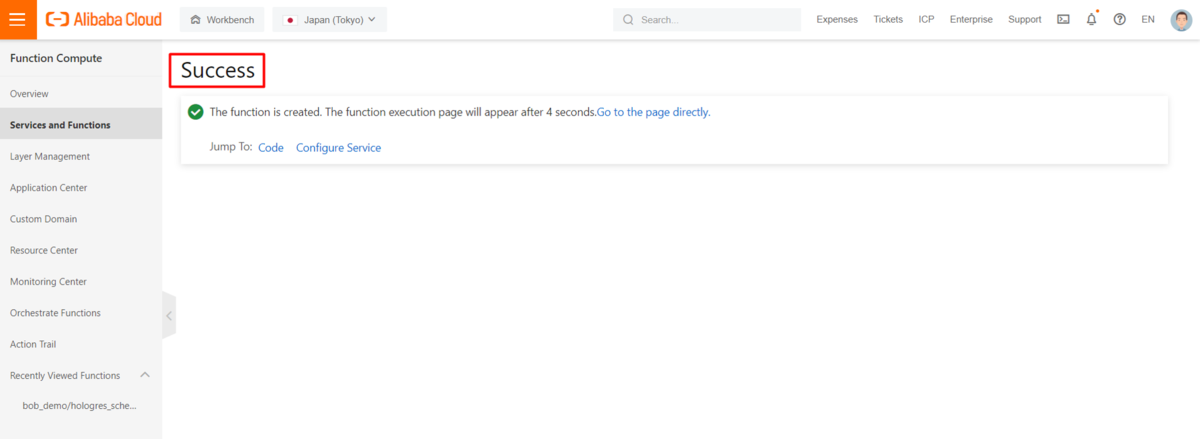
FunctionComputeにてイベント処理したい内容としてFunctionを作成します。
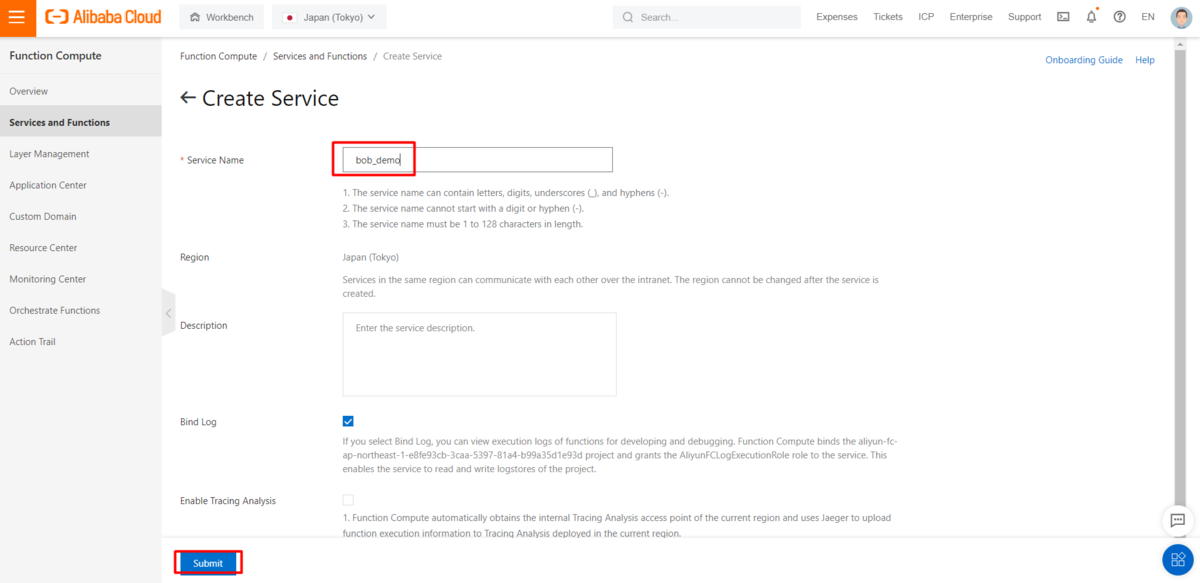
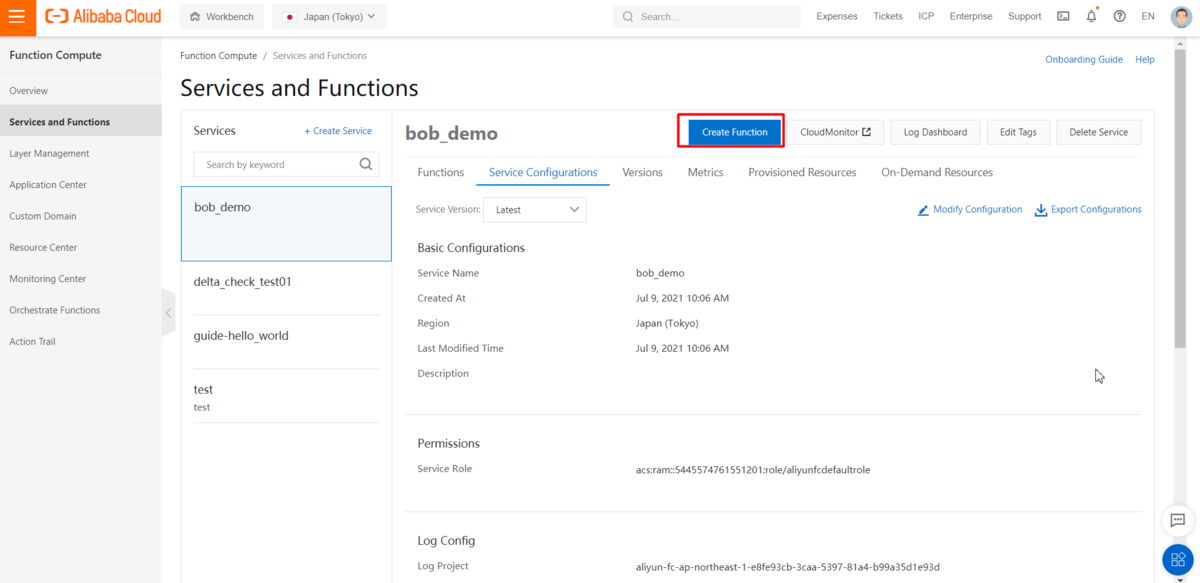
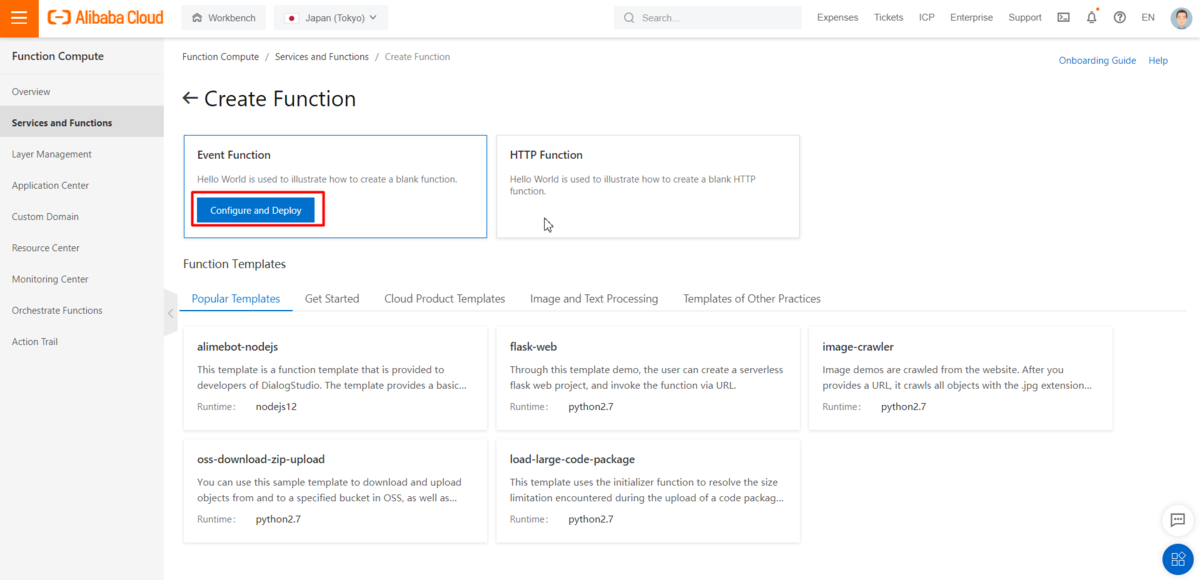
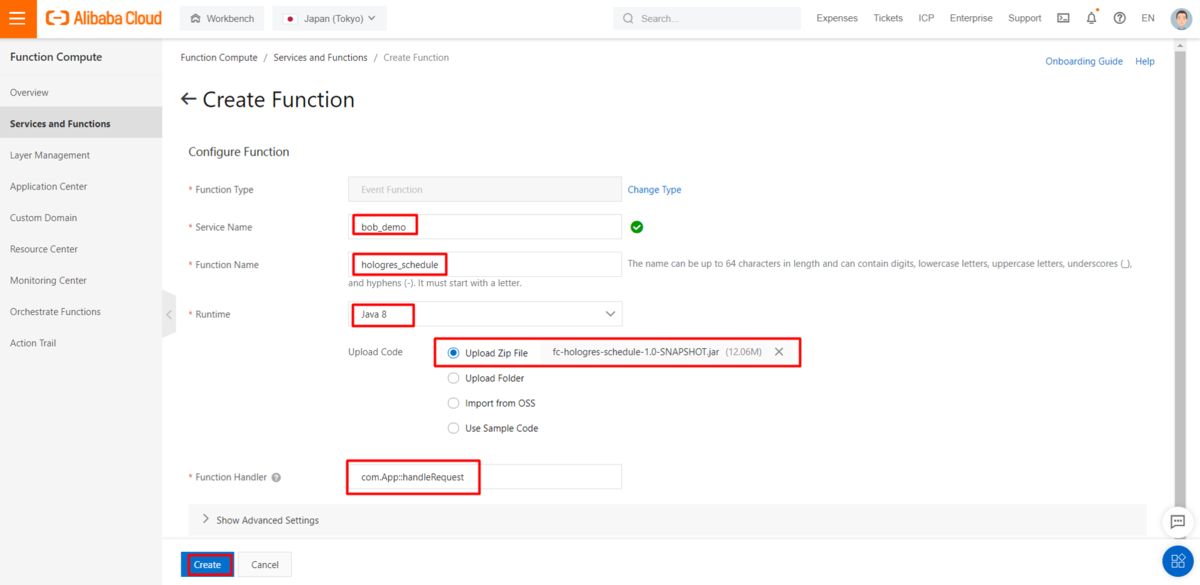
上記で作成したJARパッケージを用いて関数を作成しますが、その際、Function Handlerの設定に注意する必要があります。
Handlerは「example.HelloFC::handleRequest」という形で定義されます。Handler "example.HelloFC::handleRequest "は、exampleパッケージのHelloFC.javaに "handlerRequest "というメソッドがあることを意味します。
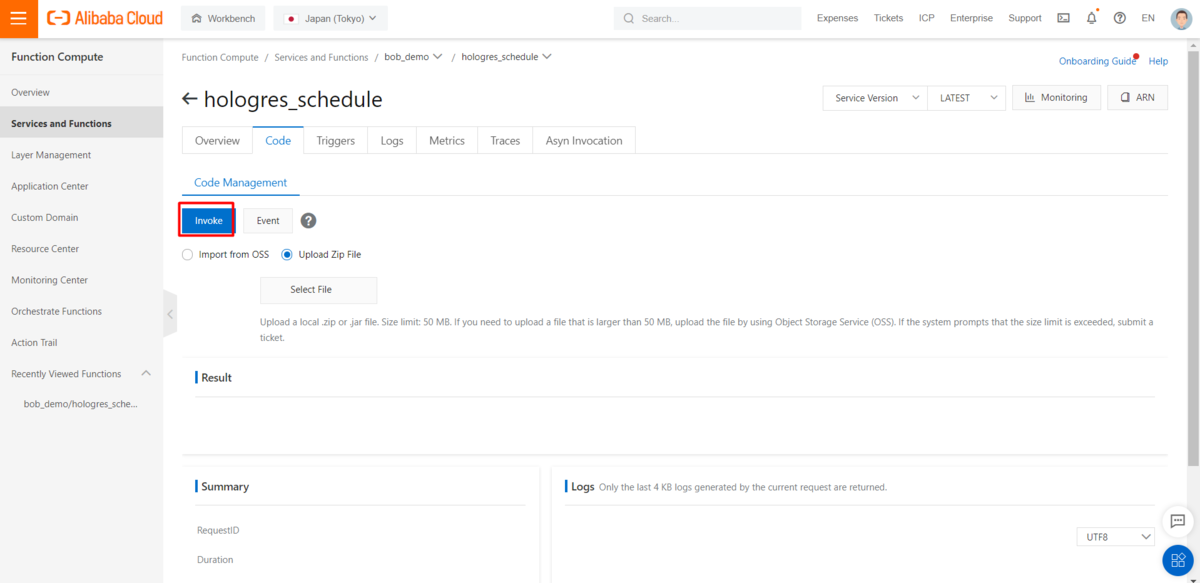
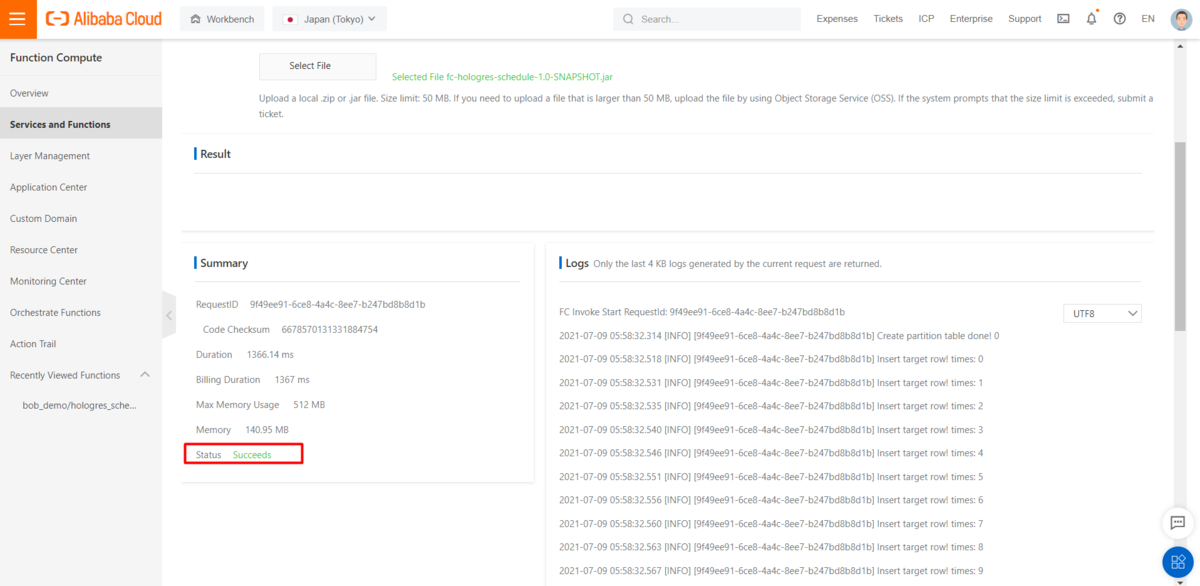
invoke ボタンをクリックすると、上記作成したScriptを手動でテストすることができます。
STEP4: time triggerの作成
FunctionCompute の Time Trigger を使えば、定期的にターゲットスクリプトを実行することができます。
Time Trigger は、interval minutes や cron expression に基づいて作成することができます。タイマー設定の詳細については、time expressionsを参照してください。
https://www.alibabacloud.com/cloud-tech/doc-detail/74676.htm
https://www.alibabacloud.com/cloud-tech/doc-detail/171746.htm
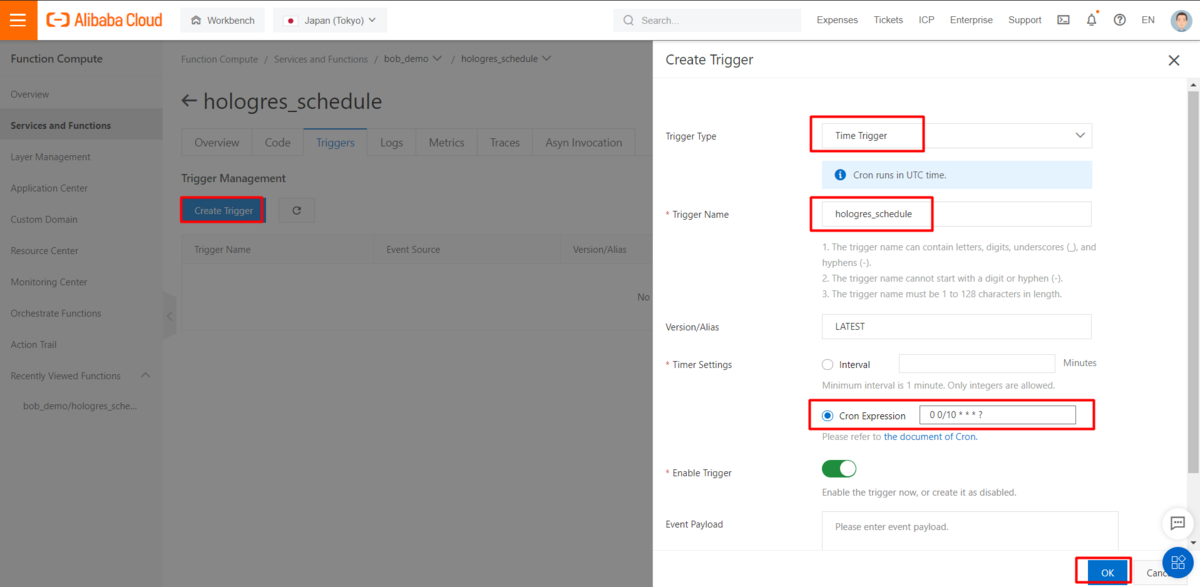
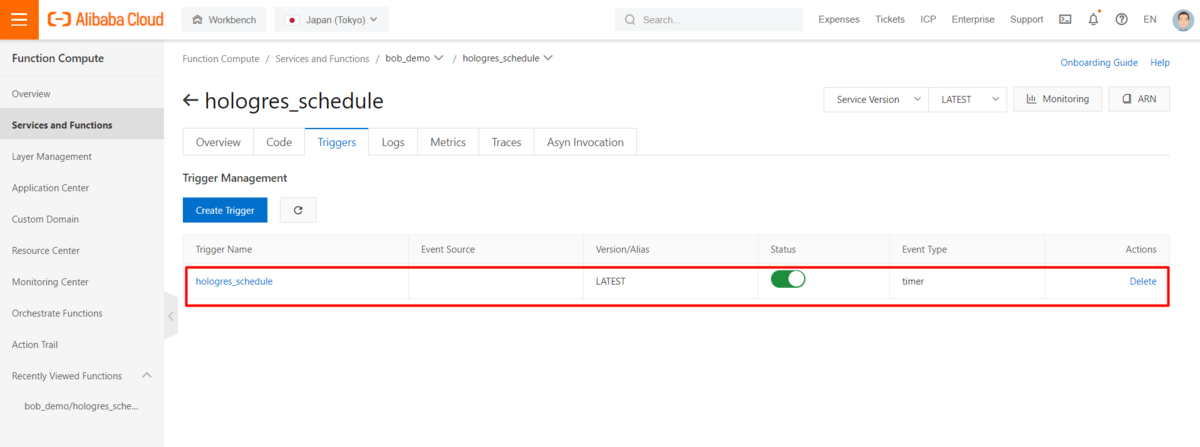
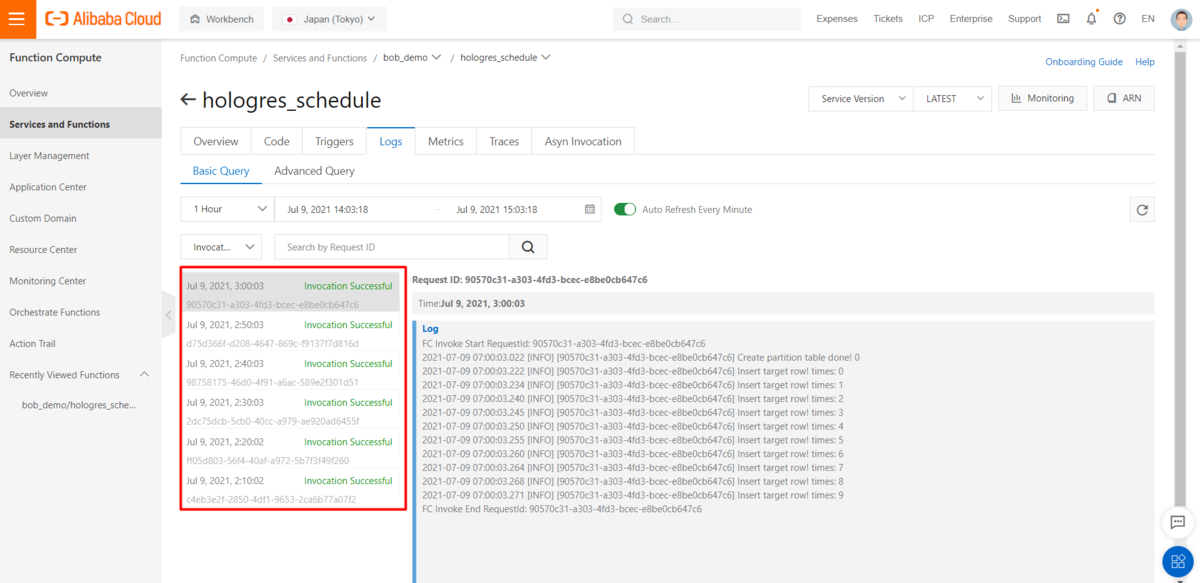
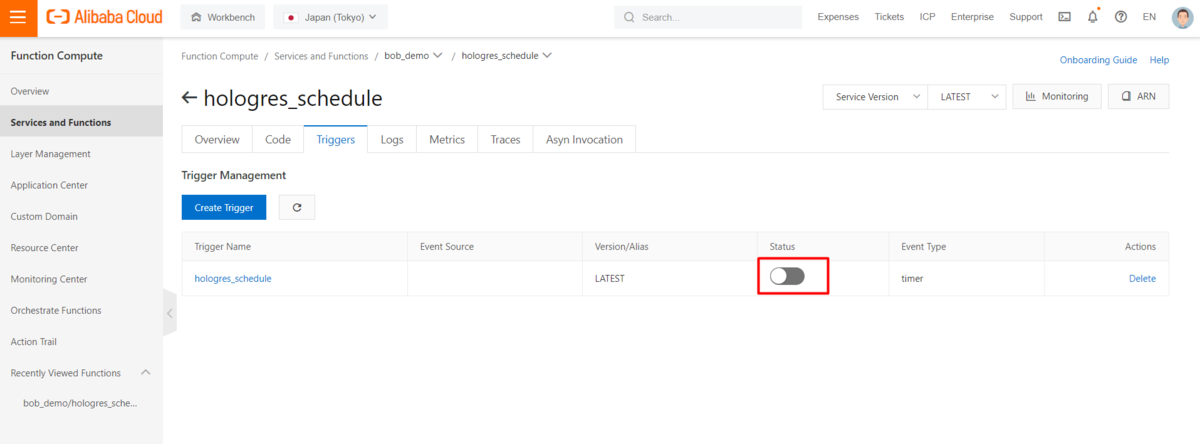
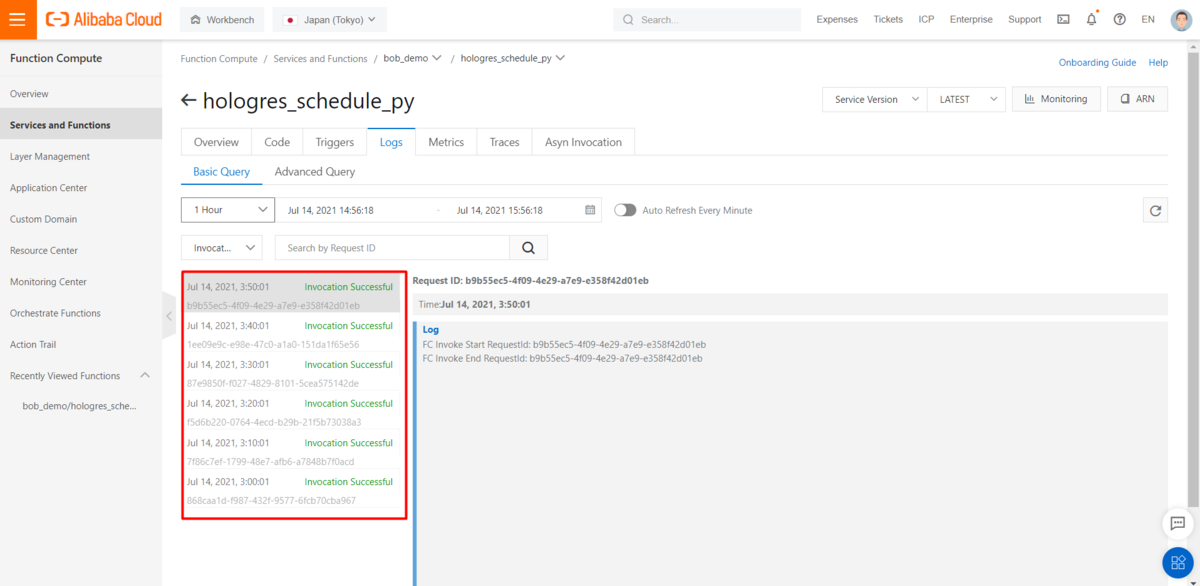
Time Trigger の作成が成功すると、タイマー設定に基づいてスクリプトが実行されます。
この例では、cron式の 0 0/10 * * ? が10分ごとにスクリプトを呼び出します。
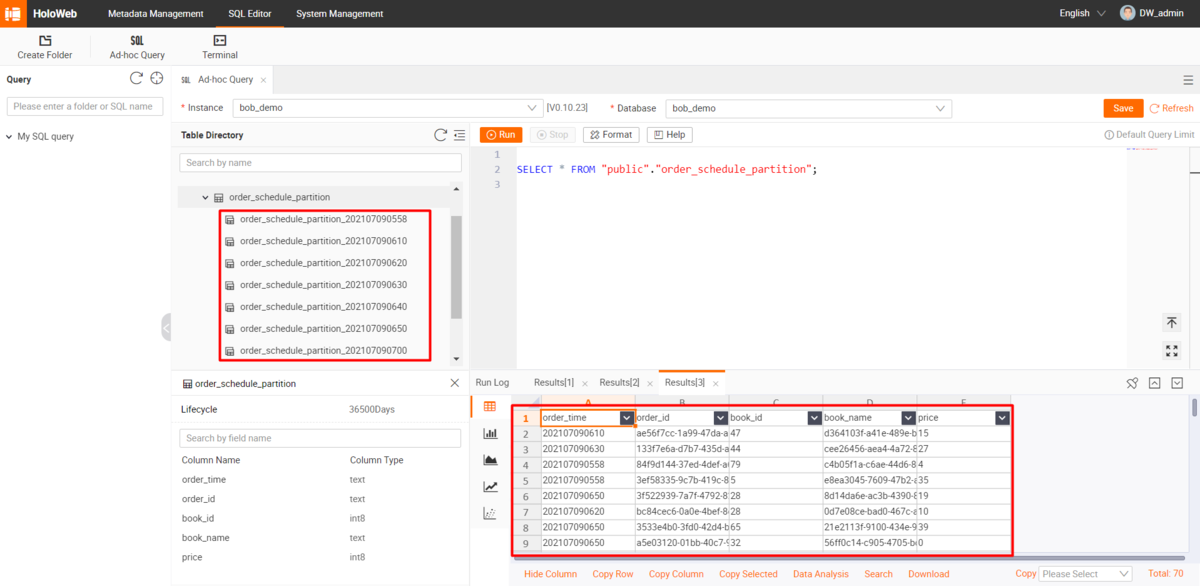
スケジュールが使用できなくなった場合、タイムトリガーを無効にすることができます。
そうすれば、スクリプトが自動的に呼び出されることはありません。
FunctionCompute によるソリューション(Python 版)
上記は FunctionCompute を Java版 として構築しました。今度はPythonを使って、同じ目的を達成するための構築方法を紹介します。
STEP1: Hologresにてテーブルを準備
Hologresでorder_schedule_partitionという名前のテーブルを、order_timeというカラムをパーティションキーとして作成します。
上記Java版で既に作成済なら、それを使いまわすこともできます。


STEP2: FunctionComputeでサンプルコードを準備
Psycopgは、Pythonプログラミング言語用のPostgreSQLデータベースアダプターです。HologresはPostgreSQL 11に対応しているので、Psycopgを使ってHologresに接続する ことができます。
https://www.alibabacloud.com/cloud-tech/doc-detail/208129.htm
以下サンプルコードを作成し、index.pyとして保存します。
import psycopg2import uuidimport timeimport randomdef handler(event, context):# Connect to the database, please update based on your own settingsconnection = psycopg2.connect(host=<ENDPOINT>, port=<PORT>, dbname=<DBNAME>, user=<ACCESS_ID>, password=<ACCESS_KEY>)order_time = time.strftime('%Y%m%d%H%M', time.localtime(time.time()))cur = connection.cursor()# Operation 1: Create partition tablecur.execute("create table public.order_schedule_partition_{0} partition of public.order_schedule_partition for values in('{0}');".format(order_time))connection.commit() # commit manually# Operation 2: Insert random datafor i in range(5):cur.execute("""INSERT INTO order_schedule_partition_{0} (order_time, order_id, book_id, book_name, price) VALUES('{0}', '{1}', {2}, '{3}', {4});""".format(order_time, uuid.uuid1(), random.randint(1, 100), uuid.uuid1(),random.randint(1, 100)))connection.commit() # commit manuallycur.close()connection.close()return 'Success'
STEP3: FunctionComputeにて、処理内容を設定
上記URLリンクでも紹介していますが、 psycopg2は FunctionCompute のPython3 実行環境の組み込みモジュールの1つではないです。そのため、カスタムモジュールを使用しながら、カスタムモジュールとコードをパッケージ化して FunctionCompute へアップロード する必要があります。
https://www.alibabacloud.com/cloud-tech/doc-detail/56316.htm#title-lx3-61k-tj6
これには2つの対処方法があります。
PIPらパッケージマネージャーを使って依存関係を管理
fun installコマンドを使って、依存関係をインストール
今回はECS上のサーバー(CentOS)で Funcraft によって、psycopg2を含む実行環境を構成する方法を説明します。
https://www.alibabacloud.com/cloud-tech/doc-detail/140283.html
最新のFuncraftパッケージを release page から入手して、ECSサーバーにダウンロードします。
curl -o fun-linux.zip https://funcruft-release.oss-accelerate.aliyuncs.com/fun/fun-v3.6.23-linux.zip
Funcraftをインストールし、バージョン情報を確認します。
https://www.alibabacloud.com/cloud-tech/doc-detail/161136.htm

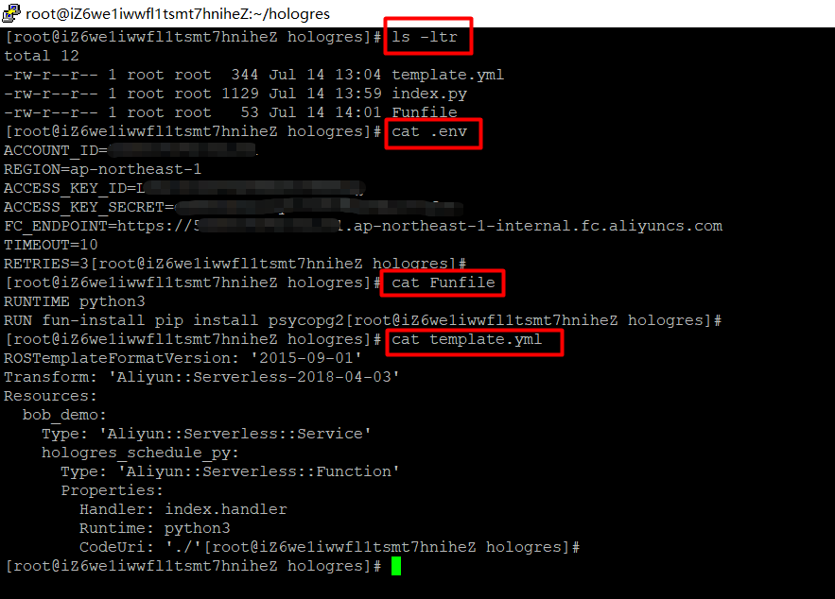
「Hologres」という名前のディレクトリを作成し、fun install init コマンドを実行して FunctionCompute のためのFunctionルートディレクトリを初期化します。これにより、Funfile という新しいファイルが生成されます。


以下のように Funfile の構成を更新し、カスタムモジュールpsycopg2を設定します。
RUNTIME python3RUN fun-install pip install psycopg2
ルートディレクトリに template.yml という名前のファイルを作成し、対象となるサービスや機能の情報を定義します。
詳しくはtemplate.yml introductionをご覧ください。
https://github.com/alibaba/funcraft/blob/master/docs/specs/2018-04-03.md
以下の内容は、現在のFunctionが bob_demo というサービスの下に hologres_schedule_py という名前でデプロイされることを示しています。
ROSTemplateFormatVersion: '2015-09-01'Transform: 'Aliyun::Serverless-2018-04-03'Resources:bob_demo:Type: 'Aliyun::Serverless::Service'hologres_schedule_py:Type: 'Aliyun::Serverless::Function'Properties:Handler: index.handlerRuntime: python3CodeUri: './'
.env という名前のファイルを新たに作成し、Alibaba Cloudのアカウント情報をconfig Funcraftに追加します。
https://www.alibabacloud.com/cloud-tech/doc-detail/146702.htm#section-3gc-t34-08o
ACCOUNT_ID=xxxxxxxxREGION=ap-northeast-1ACCESS_KEY_ID=xxxxxxxxxxxxACCESS_KEY_SECRET=xxxxxxxxxxFC_ENDPOINT=https://{accountid}.{region}.fc.aliyuncs.comTIMEOUT=10RETRIES=3
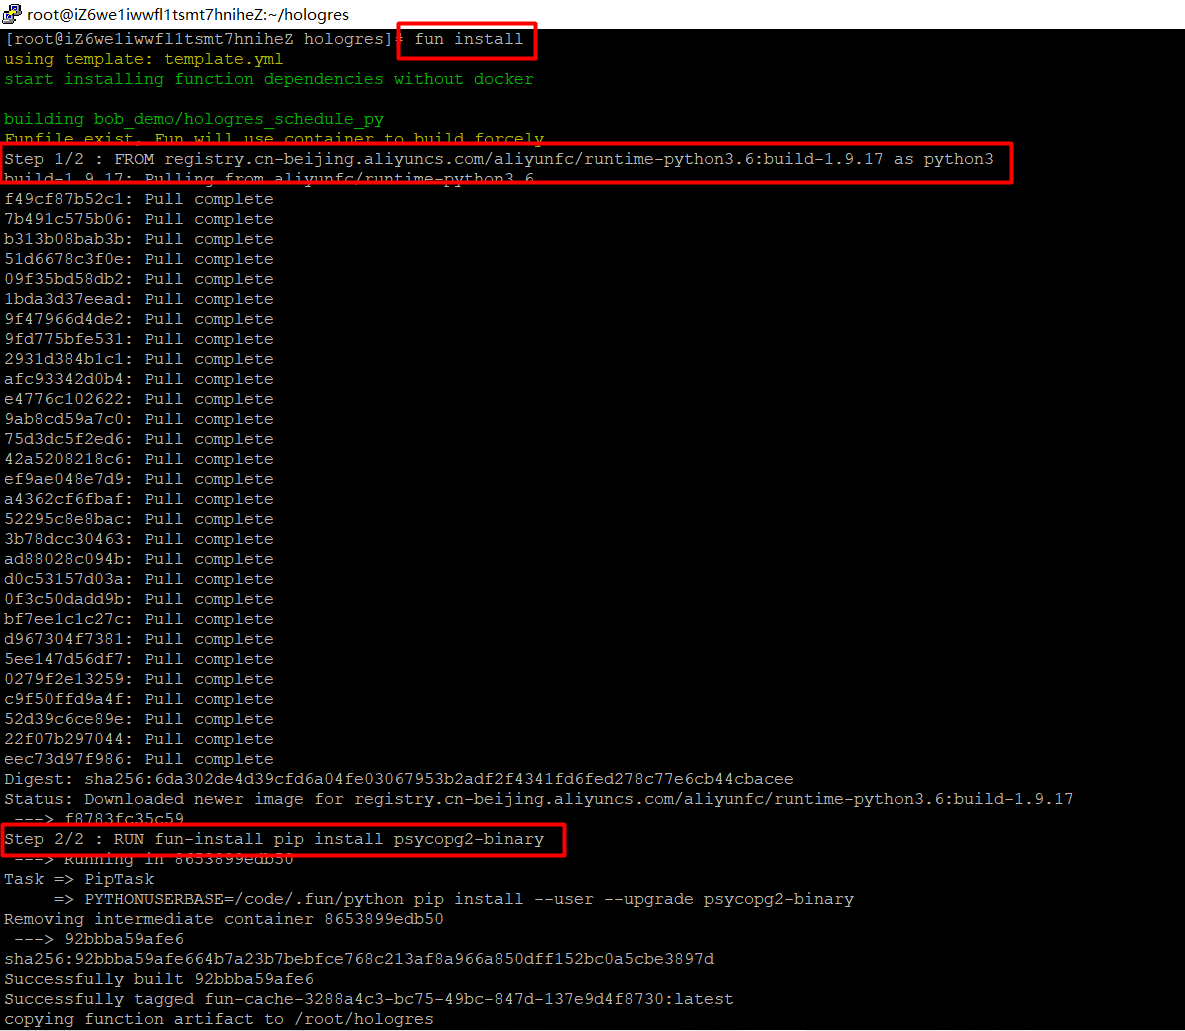
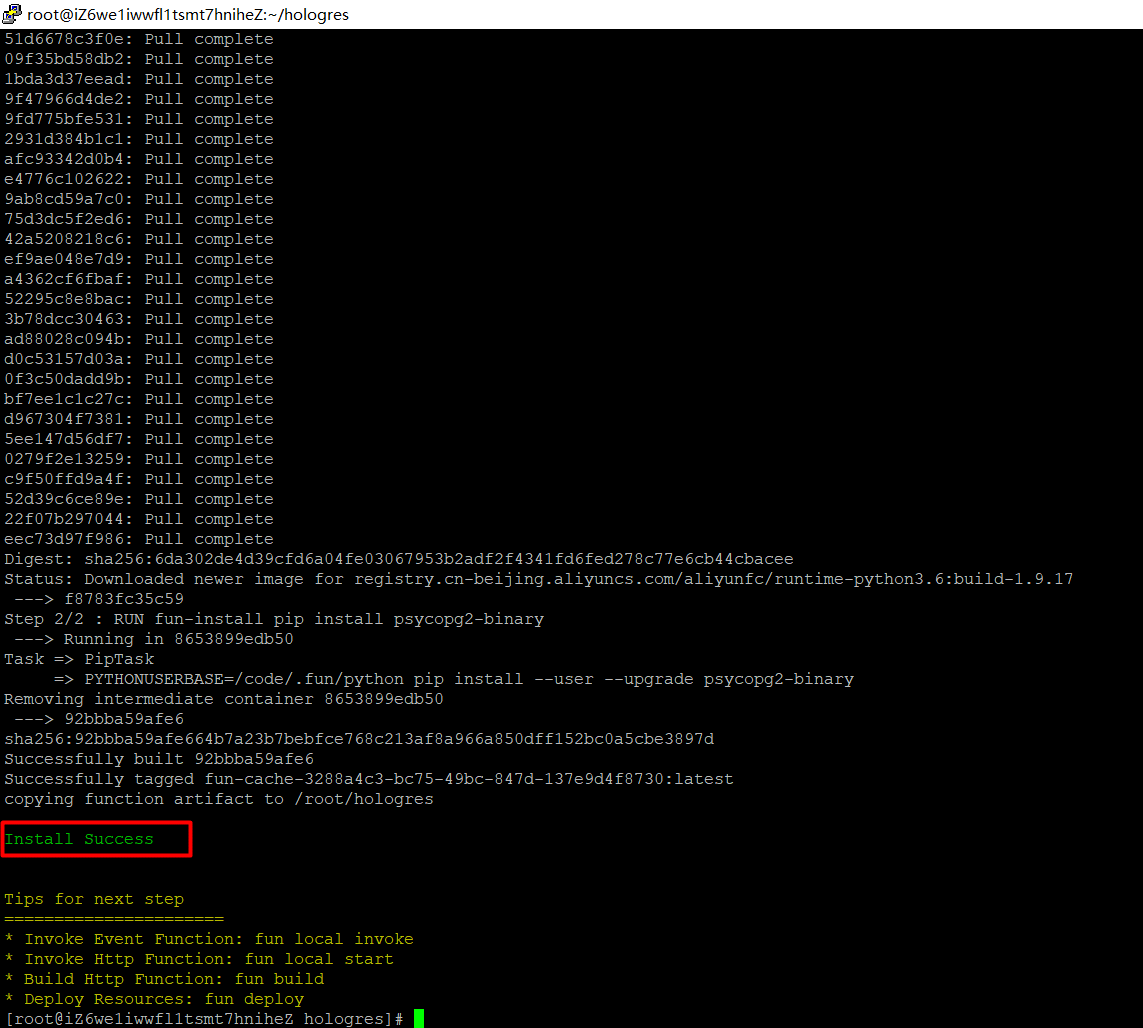
function のルートディレクトリで fun install コマンドを実行して、依存関係をインストールします。
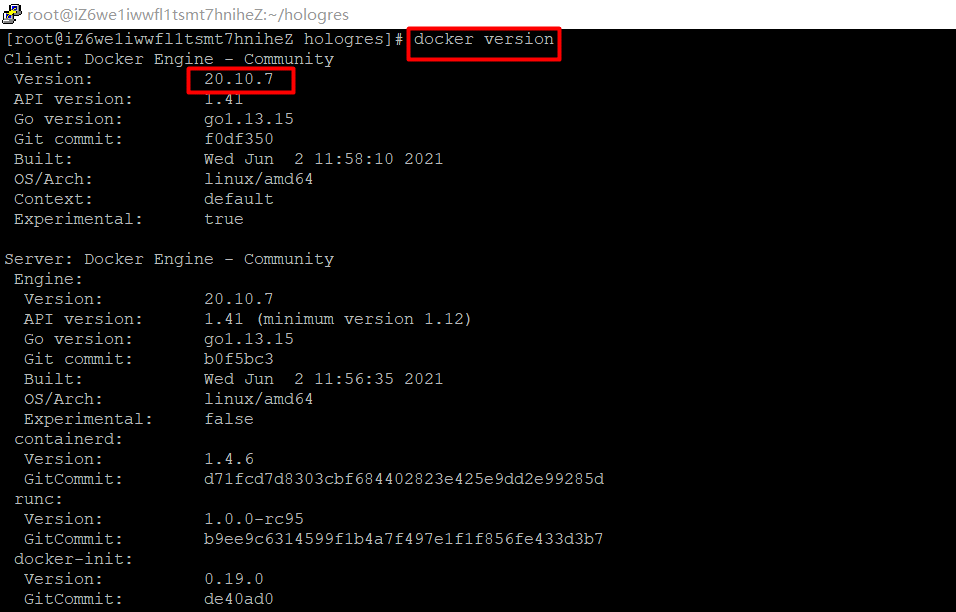
docker serviceがインストールされます。インストール後、これが正常に動作していることを確認してください。
なお、インストールにはマルチステージビルドを使用しているため、dockerのバージョンは17.05以降である必要があります。
FunCraftを使って、fun deploy -yというコマンドで function をデプロイします。
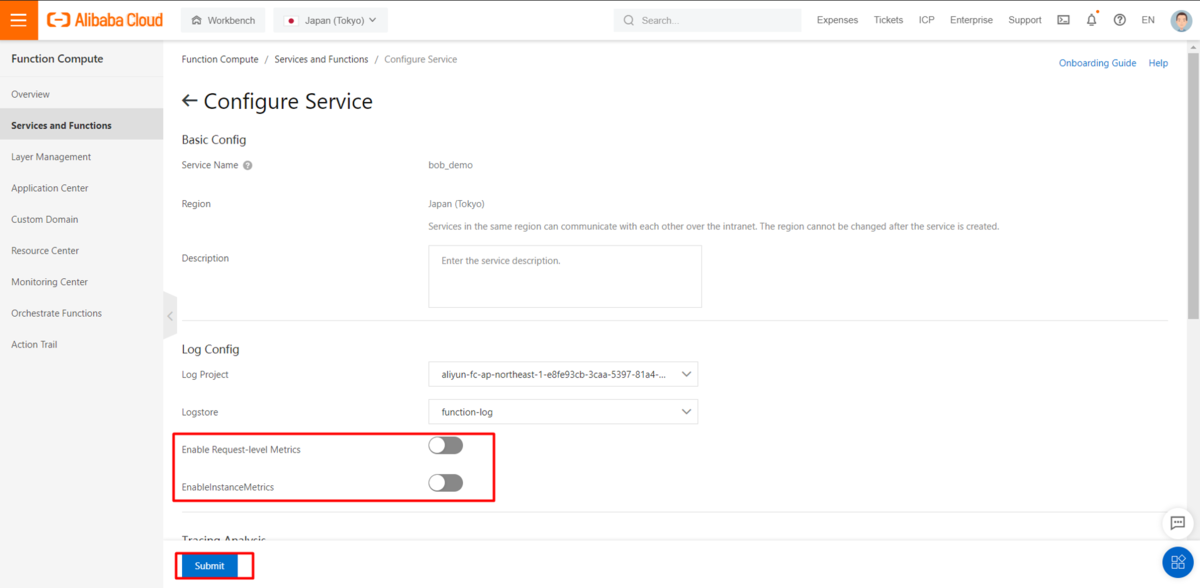
途中で「Both project and logstore are required for enabling instance metrics. ( インスタンスメトリクスを有効にするには、プロジェクトとログストアの両方が必要です) 」 というエラーメッセージが表示された場合は、サービスの設定で「Request-level Metrics」と「Instance Metrics」を無効にする必要があります。

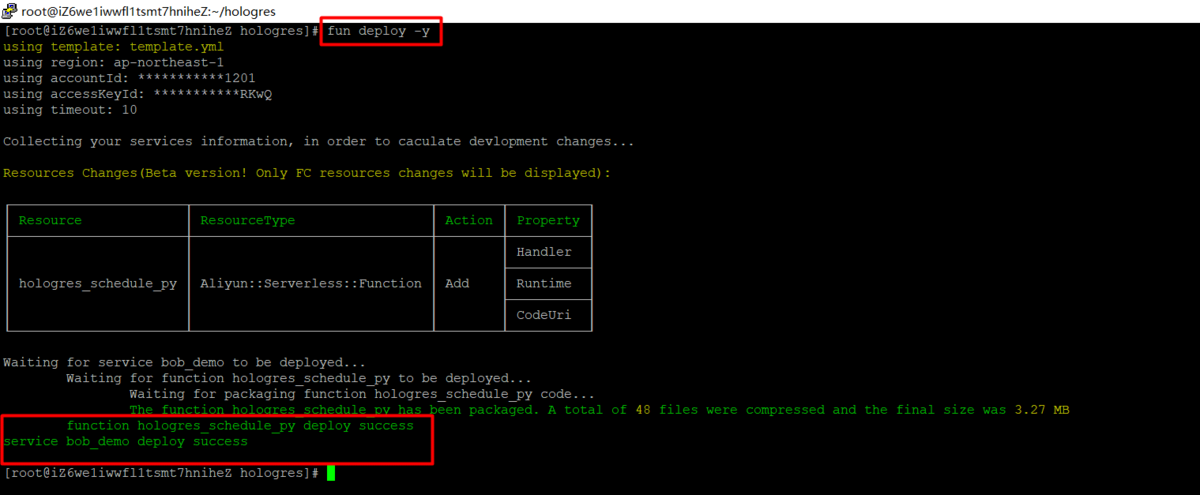
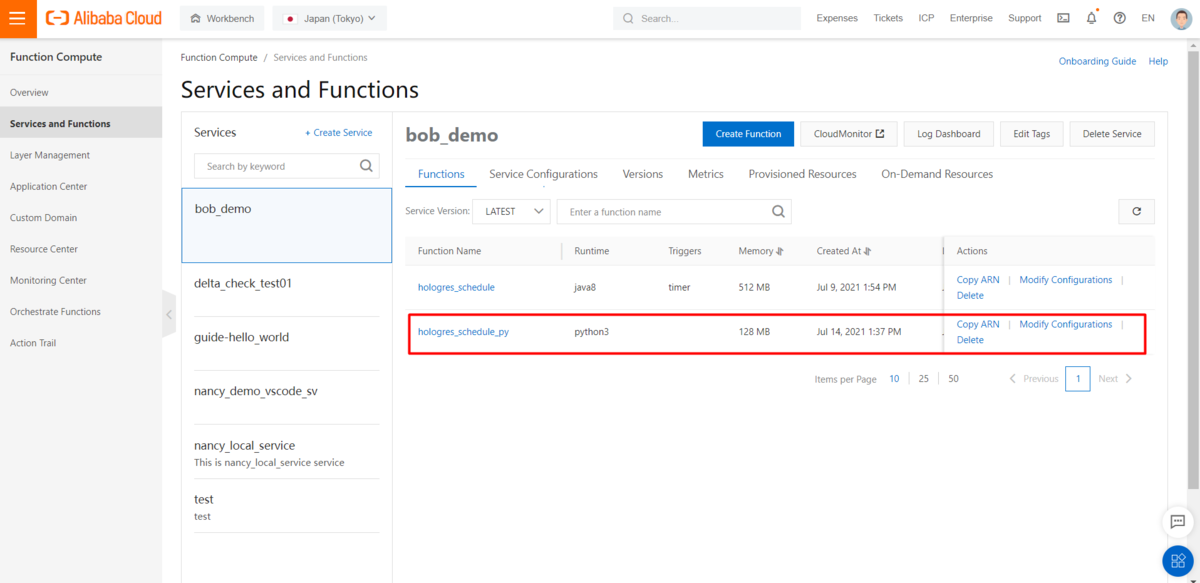
あとは手動でコンソールのFunctionを起動し、関連するログや結果を確認します。
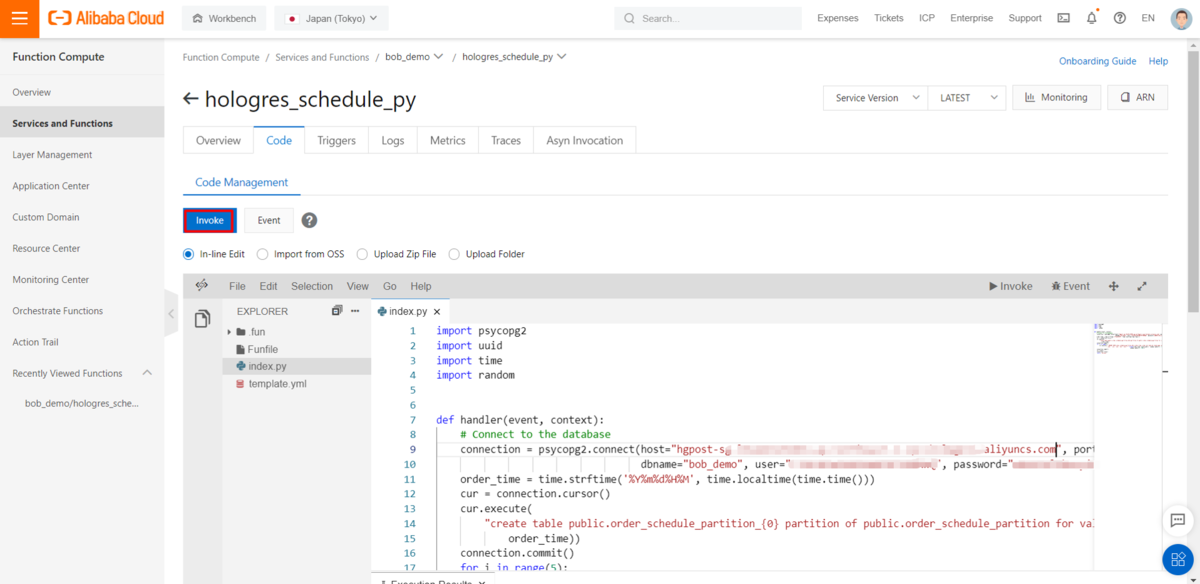
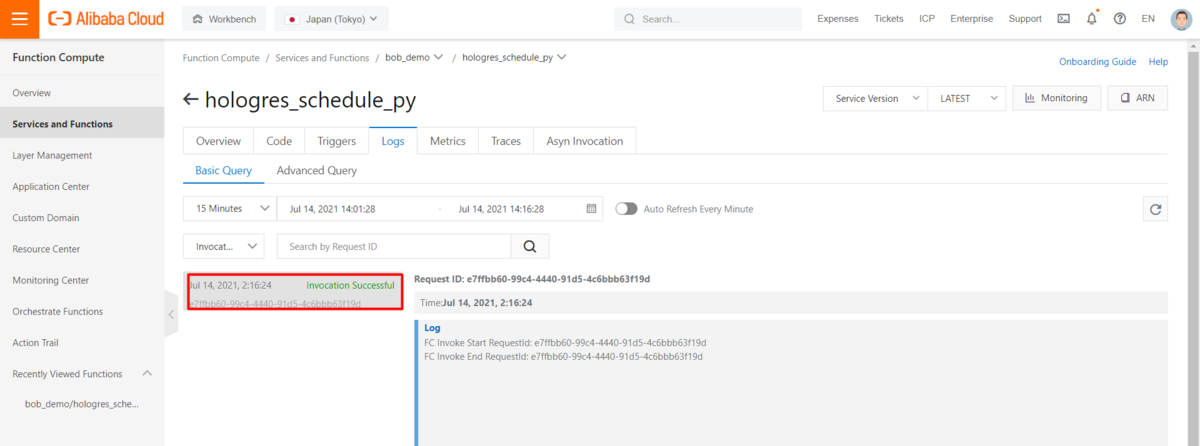
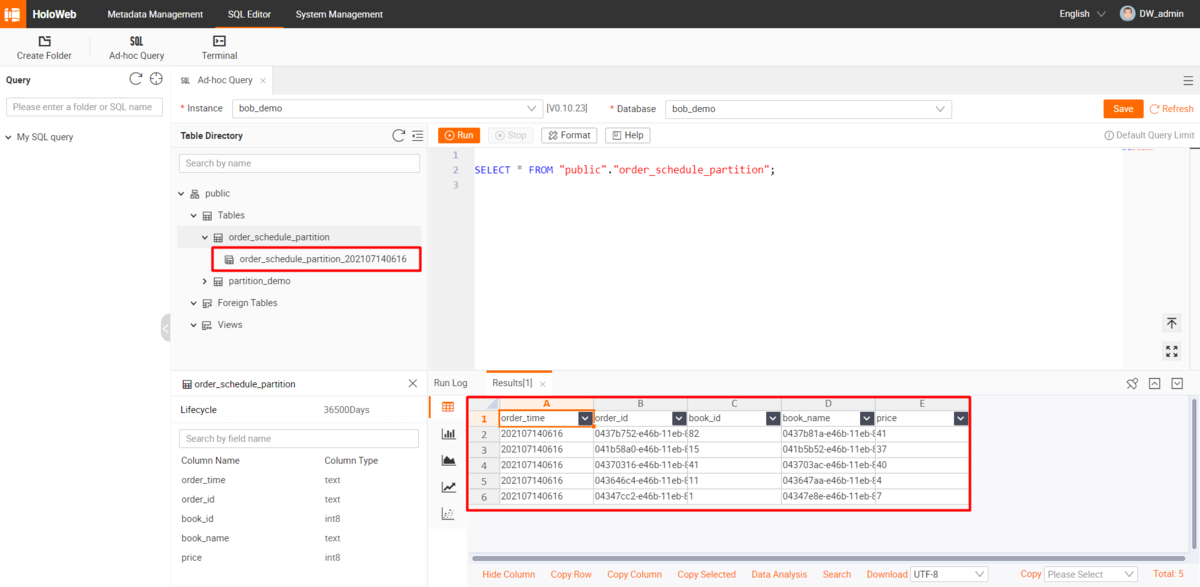
STEP4: time triggerの作成
上記、Java版でも説明していますが、 Time Triggerを作成して、スケジュールジョブの設定を行います。
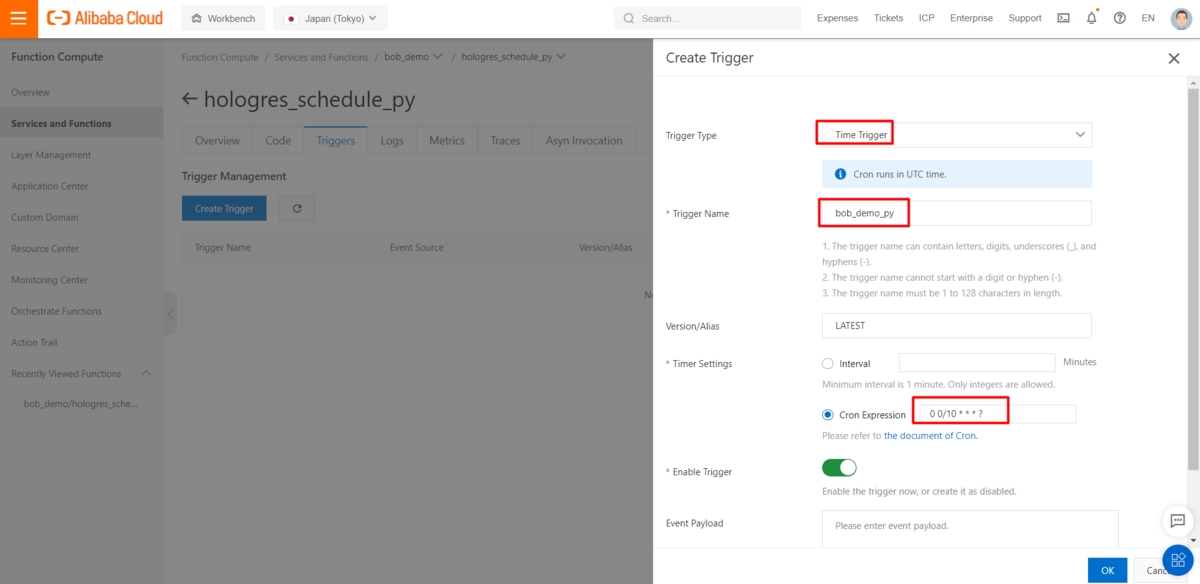
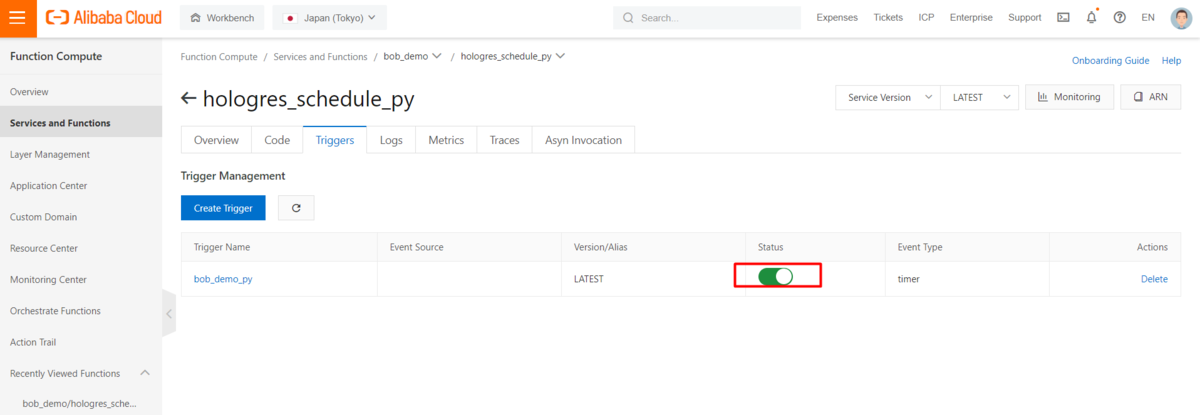
The script will be run every 10 minutes based on the created time trigger. It could be disable as well.
この Script は、作成されたタイムトリガーに基づいて10分ごとに実行されます。無効にすることもできます。
最後に
ここまで、FunctionComputeでJavaもしくはPythonを使ってHologresのジョブスケジューラを設定する方法を紹介しました。
PostgreSQL 11と高い互換性があるHologresと、FunctionComputeを使えば、DataWorks無しでもジョブスケジューラなどを色々構築、運用することができます。
